Loops
In this lesson, we'll make the program execute a certain code multiple times, that is, we'll use a loop.
Motivation
Loops are essential in programming because they allow us to repeat a set of instructions multiple times. They are useful in various scenarios, including:
- 🖥 Array Operations: Often, we need to perform actions on each element of an array individually. Using loops, we can effortlessly display or manipulate every element in the array.
- ➗ Mathematical Computations: Loops come in handy when performing repeated calculations, such as counting factorials or generating a Fibonacci sequence. They enable us to execute the necessary operations multiple times, simplifying complex mathematical tasks.
- 👾 Game Development: Imagine adding 10 new opponents to a level in a game. With loops, we can easily repeat the code that creates the opponents without having to write it 10 times.
In summary, loops provide us with a way to automate repetitive tasks and efficiently process large sets of data. They significantly improve the flexibility and power of our programs by reducing code duplication.
In the previous lesson on vectors, we already demonstrated one loop that displayed all the elements of an array:
for (int n : numbers)
{
  std::cout << n << ' ';
}
This is the simplest version of a loop in C++, but there are other types of loops that we'll cover in this lesson.
Explanation
In C++, there are three types of loops:
for- range-based version
- basic version
whiledo ... while
The most common used are for and while, and we'll cover them in this lesson.
If you want to read about the do ... while loop, see the article:
do ... while loop.
Iteration - a single loop body execution.
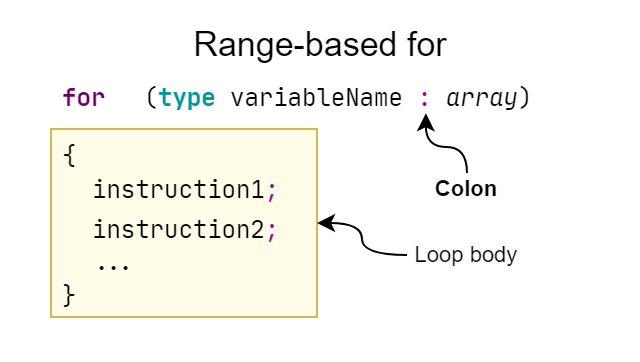
Range-based for
This type of loop is most commonly used for working with arrays, although it can also be used in other ways.

In the example provided in the Motivation section, we have a special type of loop called the range-based for loop.
It's a variation of the regular for loop used for working with collections of items. It is worth mentioning that
an array in C++ is also a range, so we can use this loop to iterate over it.
Take a look at the example:
std::vector<int> numbers = { 13, 42, -1, 0, -3, -5 };

for (int n : numbers)
{
	std::cout << n << ' ';
}
This loop sequentially traverses each element of the array numbers and writes it to the
variable n. The block of code enclosed in the curly braces is then executed.
In this case it is a simple printing of the number.
Note that the variable name n is followed by a colon (:), not a semicolon (;)!
We do not use any equal sign (=) in this notation, because the value of each element in turn
will be automatically assigned to n.
Altering the content
It is possible to modify each element of the array in the loop body. Let's write a program that will increase each even number in the array by 100 and decrease each odd number by 100. use the reference to the element. Before we explain exactly what it is and how it works, let's look at the following example:
- ✅ Modify an original number
- ❌ Modify a copy
std::vector<int> numbers = { 13, 42, -1, 0, -3, -5 };

for (int& n : numbers)
{
  if (n % 2 == 0) {
    n += 100;
  }
  else {
    n -= 100;
  }
}

// numbers: { -87, 142, -101, 100, -103, -105 }
std::vector<int> numbers = { 13, 42, -1, 0, -3, -5 };

for (int n : numbers)
{
  if (n % 2 == 0) {
    n += 100;
  }
  else {
    n -= 100;
  }
}

// numbers: { 13, 42, -1, 0, -3, -5 }
In the first case, we used a reference type, which is denoted by the ampersand (&) right after the
type name. For now the key thing to know is:
- using a reference type (e.g.
for (int& n : numbers))
In this case, the variablenuses a reference type allowing you to modify the original element of the array. This is because with each iteration of the loop, the variablenbecomes an alias of the currently processed element. - using a non-reference (e.g.
for (int n : numbers))
On the other hand, if we don't use a reference type, with each iteration of the loop, a copy of the currently processed element is created and assigned to the variablen. This means that the original element of the array cannot be modified.
This applies to any type, not only an int. This means that it is equally possible to modify the elements of an array of strings,
real numbers (e.g. float) and custom types that we will cover in the next lessons.
We'll talk more about references in one of the next lessons: References.
With an initializer list
This loop can also be used with the so-called initializer list
- Numbers
- Strings
for (int number : { 2, 1, 3, 7 })
{
  std::cout << number << ' ';
}
for (std::string str : { "hello", "world", "using", "initializer", "list" })
{
  std::cout << str << ' ';
}
Note that you cannot use the range-based for loop to modify the elements of an initializer list,
so the following code will produce an error:
for (int& a_number_from_list : { 2, 1, 3, 7 })
There's more
Range-based for loops are simple and easy to use, but at the same time are very flexible. We only scratched the surface of what you can do with them. We'll cover them in more detail later in the course.
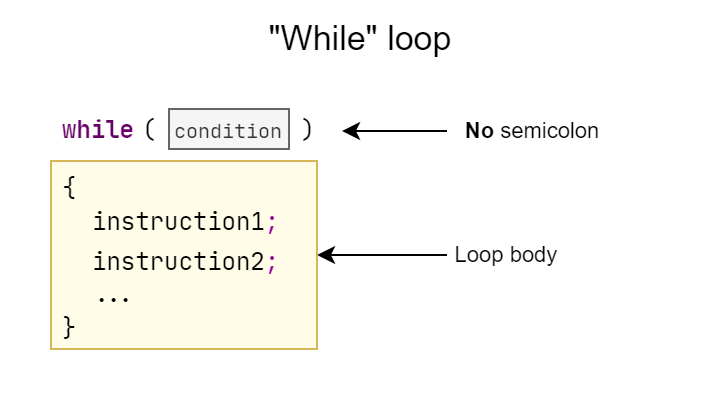
while loop

We are now intentionally moving into the while loop, rather than the basic for, as this will make
the explanation easier. The while loop executes its body as long as the condition is met:
int number = 0;
while (number <= 3)
{
	std::cout << number << ' ';
	number++;
}
0 1 2 3
The condition will be checked before each loop execution and as long as it is satisfied,
i.e. as long as number is less than or equal to 3 in this case, the body will be executed.
- printing the
number - increasing
numberby 1
After the last loop execution, the value of number will be equal to 4, so the condition will not be
satisfied, causing the loop to terminate and the computer to proceed with the next instructions.
for loop

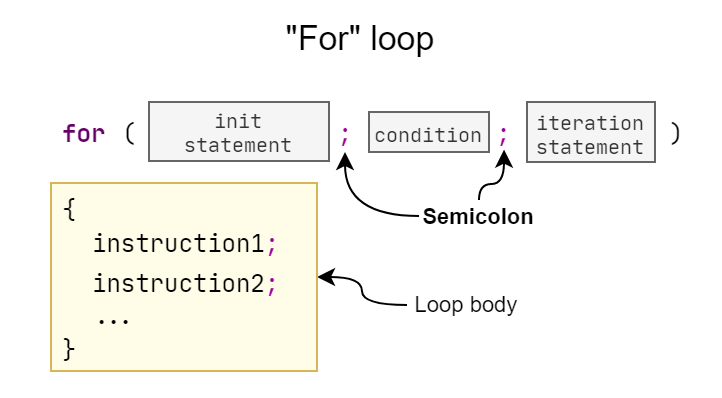
This loop is a simplification of a certain very frequently repeated pattern, and it is typically used to step through some range (such as numeric range).
Let's start with an example:
for (int i = 0; i < 10; i++)
{
	std::cout << i << ' ';
}
The above loop displays the numbers from 0 to 9. The round bracket at for consists of three parts,
separated by ** semicolons**:
| Fragment | Description |
|---|---|
int i = 0 | initial instruction (usually the creation of a variable) |
i < 10 | condition |
i++ | iteration expression |
When a program starts executing a for loop, it executes the initial statement once - in our case
creates a variable and gives it the value 0.
The program then:
- checks the condition
- unfulfilled: leave the loop
- fulfilled: go to the point 2
- executes the loop body
- performs an iteration expression and goes to pt. 1
The above for loop is equivalent to:
int i = 0;
while (i < 10)
{
	std::cout << i << ' ';
	i++;
}
Iterating through arrays
The for loop is very often used to iterate through arrays, in situations where
we either need access to the iteration number or we do not want to iterate
over the entire range.
std::vector<int> numbers = {10, 13, 15, 18, 60};
for (int i = 0; i < numbers.size(); i++)
{
	std::cout << "numbers[" << i << "]: " << numbers[i] << '}
}
std::vector<int> numbers = {10, 13, 15, 18, 60};
for (int i = 0; i < numbers.size() / 2; i++)
{
	std::cout << "numbers[" << i << "]: " << numbers[i] << '}
}
Empty parenthesis
The code given in the for loop parentheses is optional. The semicolons are required.
for ( ; ; )
{
	// code
}
The above will make the for loop execute infinitely (due to the empty condition),
unless we manually break it...
Breaking a loop (break)
We can stop the loop at any point using the break statement:
for (int i = 0; i < 10; i++)
{
	if (i == 5)
		break;
	std::cout << i << ' ';
}
This loop will display numbers from 0 to 4, because at i equal to 5 the execution of the loop will be aborted.
We can break the while loop in the same way.
Skipping a single iteration (continue)
To skip further execution of the current loop iteration we use the continue statement:
for (int i = 0; i < 10; i++)
{
	if (i == 5)
		continue;
	std::cout << i << ' ';
}
The loop will display the numbers from 0 to 9, excluding the number 5, because before it executes the
display instruction (std::cout) the program will jump to the next iteration.
Note that using continue in a for loop does not omit the iteration expression (see diagram above).
Examples
This section requires improvement. You can help by editing this doc page.
Potential errors
This section requires improvement. You can help by editing this doc page.
Additional information
This section requires improvement. You can help by editing this doc page.